Almost software engineers take a bunch of time to investigate the cause when automated tests fail.
And they try to make sure whether the error is test code itself or product code. In the case, helpful error messages and additional information help us so much and save time for the investigation.
In this article, I explain some tips to make such investigation comfortable and show you a helpful app for it.
The repository is: https://github.com/KazuCocoa/appium-source-viewer
What kind of data do you get when tests fail?
Almost case, guys, use GUI testing tools like Appium, get screenshots when tests fail. Also. Some guys get videos as an additional information as well. They’ve become common in the mobile testing world recently.
By the way, can you find the way to fix the fail only from the screenshots or videos?
If your automated test code uses displayed words to find elements or some actions, you probably fix the test code from them. But, using resource-id for Android and accessibility identifier for iOS are common recently, and they can’t find from screenshots or videos because they are embedded in code level. Not for humans. In this case, you must find elements in code level and you also must run again to make sure the test code fixed.
The time is sometimes dull and wast. Also, we must repeat launching the test app and go to the target view to see view hierarchy by uiautomatorviewer, for example. The activity takes a bunch of time.
Thus, if we can get the hierarchy and view at the same time and we can see them easily in the investigation, the time will be short.
Get the source
To achieve it, I strongly recommend you to get page_source as well as screenshots when tests fail.
The page_source looks like:
<AppiumAUT>
  <XCUIElementTypeApplication type="XCUIElementTypeApplication" name="UICatalog" label="UICatalog" enabled="true" visible="true" x="0" y="0" width="375" height="667">
    <XCUIElementTypeOther type="XCUIElementTypeOther" enabled="true" visible="false" x="0" y="0" width="375" height="667">
    ...
    ...
    </XCUIElementTypeWindow>
  </XCUIElementTypeApplication>
</AppiumAUT>
Espresso or EarlGrey get such results and show us as their results. So, we can understand why the tests failed and which elements should we get or something… (XCUITest can’t get such information, I think…)
Screenshot x Source
Only getting source is a bit difficult to image and understand the target view from it since it is just XML.
To reduce such difficulty, we can use visualisation tools like Appium-Desktop.
Offline x Screenshot x Source
Appium Desktop is so helpful to see elements mapping to the view. But the tool requires network connection between Appium server and test targets.
So, I developed a tool which can map a screenshot and its source, and visualise us like Appium Desktop. We can see some highlights in the screenshot and the source equivalent each other.
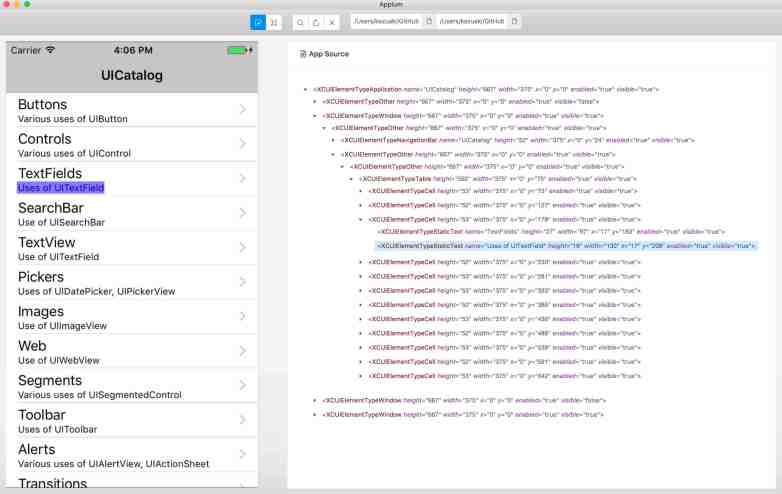
The repository again: https://github.com/KazuCocoa/appium-source-viewer
The tool will help us to find the cause and how we can fix it only for failed test data, the screenshot and its source information.
I’ve put the usage in the README, but you can use the app following:
- Download the binary from release
- Unzip and copy the app in
Application - Set a screenshot path and a source path
- Reload from reload icon
I’ve checked only on macOS, but it’s Electron-based application. So, I guess it can work on windows, too.
Conclusion
I put some tips to make fix failed test easy and the app to help it.
Have a good testing!
