Dependency Injectionの、Dagger1とDagger2を学んで、DIの理解を深めてみる。Tasting Dagger 2 on Androidを参考にしました。
- Dagger1はGuiceに影響を受けている。特徴は以下。Compile time injection。
- Multiple injection points: dependencies, being injected.
- Multiple bindings: dependencies, being provided.
- Multiple modules: a collection of bindings that implement a feature.
- Multiple object graphs: a collection of modules that implement a scope.
- Dagger2はAutoValue projectの影響を受けているらしい。
- No reflection at all: graph validation, configurations and preconditions at compile time.
- Easy debugging and fully traceable: entirely concrete call stack for provision and creation.
- More performance: according to google they gained 13% of processor performance.
- Code obfuscation: it uses method dispatch, like hand written code.
Dagger2をTasting
- @Inject
- 依存性を要求する。Daggerはこのアノテーションされたクラスと、満足する依存性を構築する。
- @Module
- 依存性を提供するメソッドのクラスを示す。Daggerはクラスのインスタンスを生成するときに依存性が存在する場所を知ることができる。
- モジュールが分割されたり、一緒に構成されるように設計されている
- @Provide
- モジュールの内部において、Daggerにどのように依存性を構成し、提供してほしいかを記述する。
- @Component
- @Injectと@Moduleの間のブリッジ
- 定義したすべての型のインスタンスを提供する
- @Componentを付けたい、依存している対象を構成する@Moduleすべてを関連付ける必要がある。それがないと、コンパイル時に正しく注入の関係を作れずにエラーになる。
- 依存しているproviderを、moduleを通して知る。
- @Scope
- Dagger2にて、カスタムアノテーションを通じてより具体的なスコープを絞る方法を提供する
- 例
- @PreActivityアノテーション
- Activityが生存している間のみ生存しているようにする
- @Qualifier
- 依存性を区別するにクラスの型が不十分であるときに使われる
- 例えば、Androidはcontextが異なるとactivityなど異なることが多い。@ForApplicationや@ForActivityでは、特定のcontextに依存するActivityなどのみを提供する
Dagger2における依存性注入方法
- Constructor injection: by annotating the constructor of our class with @Inject.
- Field injection: by annotating a (non private) field of our class with @Inject.
- Method injection: by annotating a method with @Inject.
ActivityやFragmentsに対してはfield injectionが良いらしい。なぜなら、それらのconstructorsにアクセスできないから。
具体例
Our example の欄をみる。その例題となるコードは以下。
なにとなく、
- @Providesには providor prefixをつける
- @Moduleには Module suffixをつける
- Daggerを使ったコンポーネントのimplemtationを作るときは Dagger prefixをつける
などの慣習が書かれている。
例はコード読みながらでないと頭に入ってこないので、頭に馴染むまで何度か読もう。
依存
@Component では、その引数として modules や dependencies を付与したり、それらを複数与えることができる。少し使い方にモヤモヤしていたのですが、以下の Application Component 、 Activity Component、 User Component のどれに依存してinjectしたいModuleなのかと、その @Component にひも付けたいmodulesなのかをたどっていくと、理解が深まったきがする。

例えば、例として挙げられているUserComponentは以下のコードとして宣言されています。これはActivityComponentを継承していて、この例より前の箇所でActivityComponentはActivityModuleと関係づけられています。なので、UserComponentではActivityModuleもひも付ける必要がある。あとは、このActivityComponentはのアクティビティはApplicationと同じライフサイクルを持っている必要があると宣言されているので、こんUserComponentもActivityComponentと同様にApplicationComponentと依存関係を持つ必要がある。
@PerActivity
@Component(dependencies = ApplicationComponent.class, modules = {ActivityModule.class, UserModule.class})
public interface UserComponent extends ActivityComponent {
  void inject(UserListFragment userListFragment);
  void inject(UserDetailsFragment userDetailsFragment);
}
他のサンプル
Dagger 1 to 2 migration process
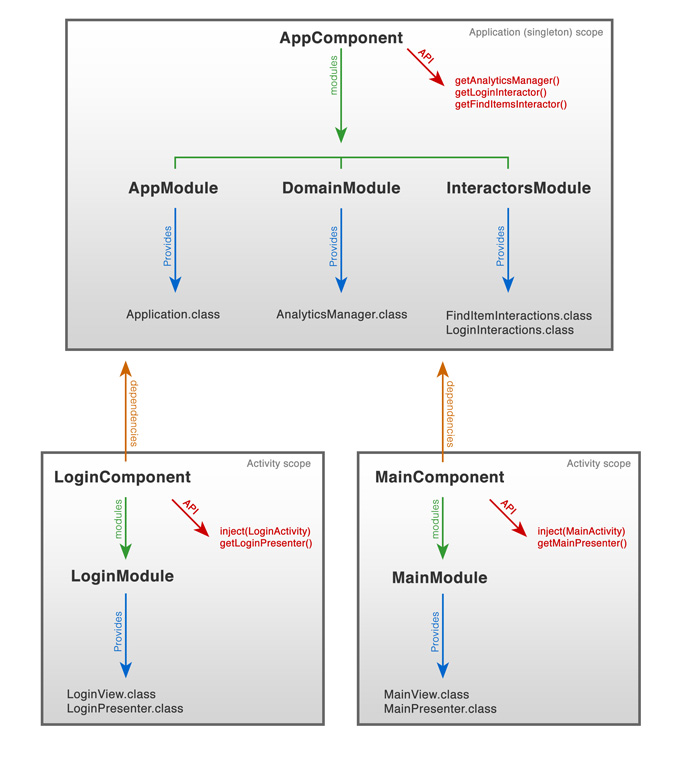
この以下画像とその説明で、依存関係のひも付かれかたがさらに馴染んできました。自分がどのmoduleに依存するのかを宣言することで、依存関係を保持したいmodule間を指定できるのですね。なるほど。
サンプル読んで、もう少し慣れを進めよう。
あと、@Component付近の、コンパイル前の依存性を書くところは時折見返さないとすぐこんがらがりそうだだ。

2 Comments